I conducted a series of experiments in an adjustable-width flume to study how different types of floods lead to different types of stream channels. You can read more about those experiments on the "Current Research" page.
Interested in learning more about how the flume I used for these experiments works? Keep reading!
Interested in learning more about how the flume I used for these experiments works? Keep reading!
Why Use a flume?
Flumes are great tools to study rivers in a simplified setting. You can manipulate and control all kinds of factors depending on your research question. In a flume, it's also relatively easy to isolate the effects of a single variable on channel morphology or sediment transport patterns, by changing only the variable of interest and keeping all other experimental conditions constant. For example, I was interested in isolating the effects of hydrograph shape on channel morphology, so I varied the magnitude and timing of flow during the 'flood' but kept everything else constant or equivalent. A hydrograph, by the way, just refers to the change in flow rate over time.
Some of the aspects of river systems that you can control or change include: slope, flow rate, sediment size, sediment feed rate, the presence or absence of 'bedrock', presence of 'vegetation', base level, stream width, bank strength, and more. Consequently it's easy to measure a number of parameters including: topography, sediment output rate, movement of individual grains, the grain size distribution of different patches, flow hydraulics (e.g. depth and velocity), and more.
Below, I discuss how the flume that I used operates, but all kinds of different flumes and physical experiments are used to study natural processes!
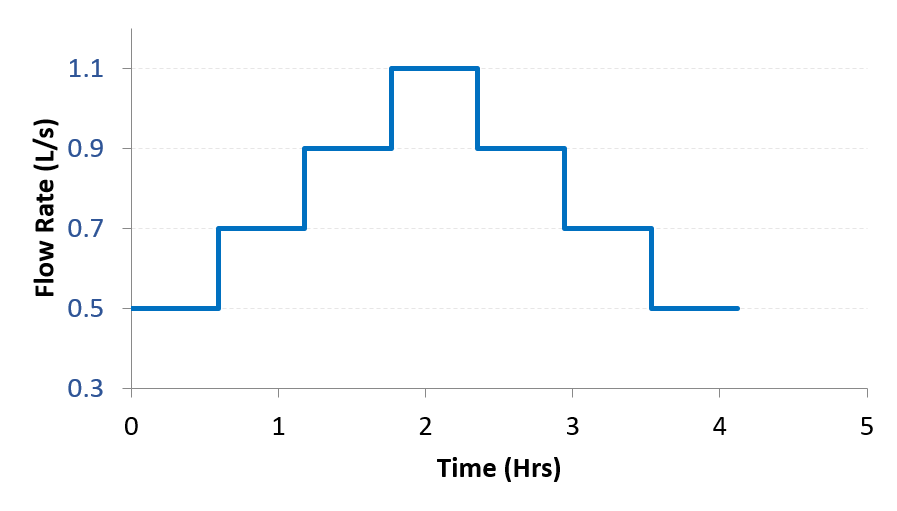
Example of an experimental 'hydrograph' or flood (aka the variable that we varied in our experiments). In the flume, we used steps to compose the hydrograph, but in natural rivers, flow rate would change smoothly and continuously over time
|
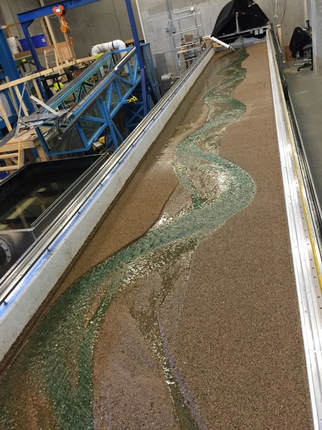
Photo of the flume and set-up I used for my experiments. . . neat!!
|
How are flumes like or unlike natural rivers?
In natural rivers, water and sediment move down a slope. The exact same processes that move and arrange sediment in natural streams occur in the flume. Unlike natural streams though, flumes are often more simple systems that can lack vegetation, have fixed banks, are straight with a fixed width, and don't evolve over the whole range of flows that occur in a natural river.
Designing the experiments
In order to make sure that the physical processes in the flume match those we see in natural rivers, we scale the dimensions of the flume in order to maintain physical similarity between the flume and a natural river. In the case of my flume experiments we used a 1:45 length scale ratio, which means the flume is 45 time smaller than a natural river with the same physical properties. See pictures below!
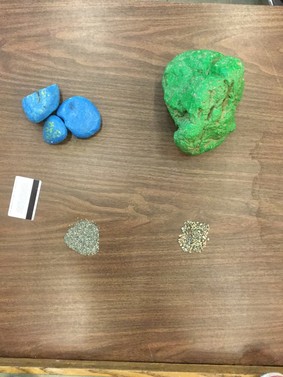
Here's an example of different sediment sizes used in my physical experiments (bottom piles) compared with the same sediment sizes you would observe in the field if we 'scaled' our experiments up to the size of a natural river!
|

With help from an assistant, you can see 'flume man,' a paper human who would be 6 meters tall if we scaled him (and the river) up to real-life proportions!
|
Prepping the experiment
Before any water was released into the stream channel, we created a rectangular pilot channel by dragging a rectangular 'template' along the stream bed. See a photo of my 'lab assistant' (aka husband) performing this first step in the experimental process. To keep conditions constant among experiments, we 'templated' the stream bed before every run (or flood).
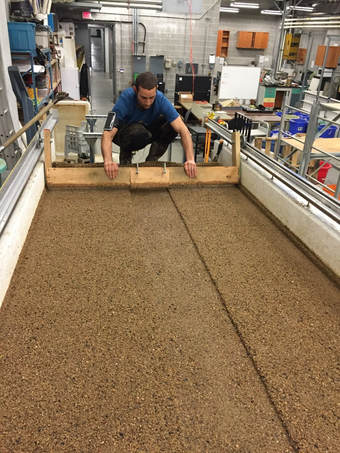
Brandon uses the template to create a rectangular pilot channel
Starting and Running an Experiment
After 'templating' the stream bed, we turned on the water pump to a very low level. This allowed water to fill a stilling well, or reservoir, at the upstream end of the flume. Once the water level was high enough, it began to flow out into the stream channel. We used the pump to control the water level in the stilling well, and thus the amount of water (or flow rate) entering the stream channel. At first, we only allowed a small amount of water into the channel to wet the stream bed, then once that trickle of water had saturated the entire length of the flume, we cranked up the flow rate to begin the experiment.
Once the flow was turned up to the correct level, we immediately turned on the sediment feeder. Sediment feed, or the amount of sediment entering a stream channel, plays an important role in stream channel dynamics. Too little sediment feed, and the river becomes 'starved,' which can lead to incision (aka erosion of the stream bed). If the sediment feed rate is too high, it may pile up and force flow onto the floodplain, which can lead to flooding and eventually the formation of a braided channel. We set our feed rate in between 'too low' and 'too high,' so that the amount of sediment we added was just equal (more or less) to the amount of sediment carried downstream by the flow. A river is said to be in 'equilibrium' when the rate of sediment input and output is balanced.
Rather than manually scoop sediment into the flume for hours on end, we used a sediment feeder that automated the task. A photo of this unique feeder can be found below. The design is called an 'inclined rotating pipe feeder,' and it uses a small electric motor to turn a pipe (set at an incline) to convey sediment from the hopper, through our pipe contraption, and into the flume.
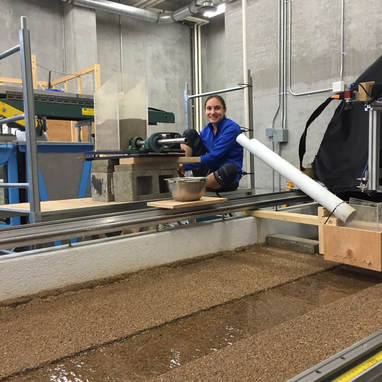
Photo of the sediment feeder and a human for scale
|
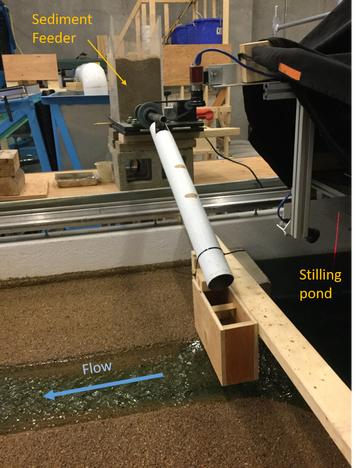
Photo of the sediment feeder and stilling pond, with labels
|
Monitoring the flume during experiments
Once the experiment had begun, the flume needed constant babysitting. . . no leaving for leisurely coffee breaks! The main jobs once the flume was running included: making sure the sediment feeder didn't run out of sediment, making sure the flow rate was correct (as the flow rate could drift due to variations in the pump), taking observational notes, and collecting sediment at the farthest downstream end of the flume. The first three jobs are fairly self-explanatory. The last job, collecting sediment at the outlet of the flume, was done to estimate sediment transport rates. The sediment transport rate varied with the flow rate (i.e., larger flow rate corresponds to higher sediment transport rates) and, in our case, with the evolution of the channel from a straight, rectangular channel, to a meandering channel.
We manually transferred sediment from the collection buckets to a labeled pan, which we then used to dry and weigh the sediment. The collection bucket at the outlet had mesh panels that allowed water to pass through, but not sediment (see photo below).
We manually transferred sediment from the collection buckets to a labeled pan, which we then used to dry and weigh the sediment. The collection bucket at the outlet had mesh panels that allowed water to pass through, but not sediment (see photo below).
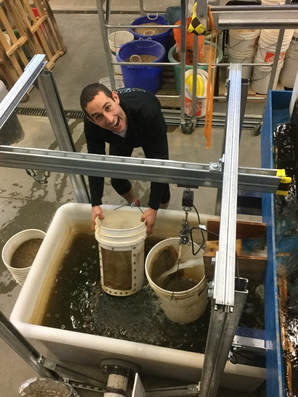
Photo of the sediment collection bucket, and a changing of the buckets, in action!
|
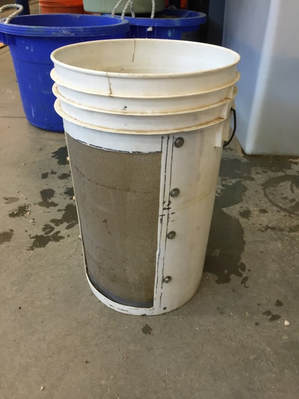
Close-up of the high tech sediment collection bucket
|
Finishing the experiment
Coming soon!
Data Analysis
Coming soon!